If you want to use your assigned applications from Okta directly from the Workspace ONE Access console we have to integrate Okta as an application source in Workspace ONE Access.
After the configuration the applications which the users were assigned to in the Okta tenant will directly be available in the Workspace ONE Access user portal as well. You further manage all the applications which came from Okta in the Okta administration console including the assignments. That means, if you delete, deactivate or unassign a user from an application, that application is no longer accessible and visible in the Workspace ONE Access user portal of the user. The same if you remove the user from the Okta application source in the Workspace ONE Access administration console.
Workspace ONE Access use the Okta tenant information which are configured for the connection to Okta. Apps und user entitlements will be retrieved whenever a user log into Workspace ONE.
The applications which came from Okta will not be shown in the Workspace ONE Access administration console because they further will be administrated in the Okta console.
That integration supports the following type of Okta applications:
- SAML 2.0
- WS-Federation
- Bookmark
- OpenID Connect
- SWA-Apps are not supported (Secure Web Authentication)
Okta – Create API Token
First of all, we have to configure the Integration of Okta via API Token in the Workspace ONE Access administration console. Therefore, we create a API Token in the Okta console.
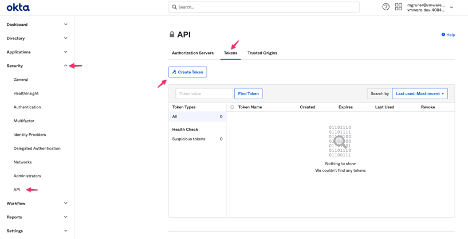
- Log into Okta
- Security
- API
- Tab Tokens
- Create Token
- Enter a Name for the Token
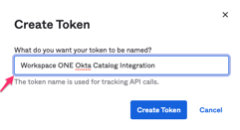
- Create Token
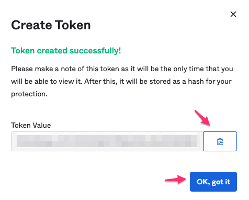
- Copy the Token and save it to a textfile
- Caution: That´s the only time you can see the token. After you close the window you can´t see the token anymore. It will be stored as a hash for security reasons)
- Caution: The token expires 30 days after it last used. With each time it will be used, the expiration date will be extended by 30 days.
Integrate Okta (API) information in Workspace ONE Access
As next we will provide the Okta API Information to Workspace ONE Access.
- Log into Workspace ONE Access administration console
- Identity & Access Management tab
- Setup, on the right side
- Okta tab
- Provide the recent created Okta API Information
- Okta Cloud URL (your Okta tenant URL)
- Caution: please be aware that there is no “admin” in the url because that is the admin console and then the Application launch from Workspace ONE will not work
- Okta API Token, which we created recently
- User Search Param (use the attribute which is used to search for users in the Okta Directory)
- Can be username, UPN or email
- Example username: ${user.userName}
- Okta Cloud URL (your Okta tenant URL)
- Save
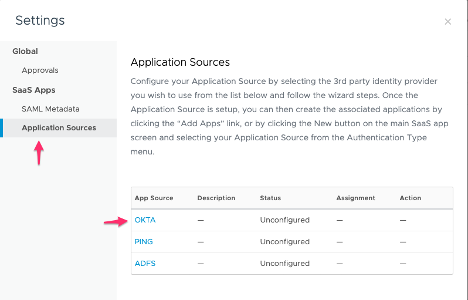
Configure Okta as application source in Workspace ONE Access
- Log into Workspace ONE Access administration console
- Click on Catalog (not the arrow near them)
- Settings
- Application Sources on the left
- Click Okta
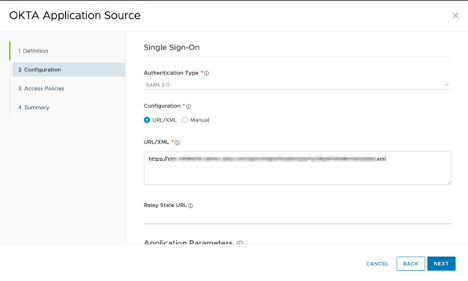
- Definition – Add a description if you want
- Next
- URL / XML – paste the SP metadata information from the file that we downloaded from Okta as we configured Workspace ONE Access as 3rd party SAML iDP in Okta (Workspace ONE Access as 3rd party iDP in Okta)
- Or enter the link where we downloaded the file
- If the Link don´t work, open the file with an text editor and copy and paste the text
- Or enter the link where we downloaded the file
- If you want to use Device Trust for iOS and Android mobiles, click Advanced
- Enable the following options (Yes)
- Device SSO Response
- Enable Force Authn Request
- Enable Authentication Failure Notification
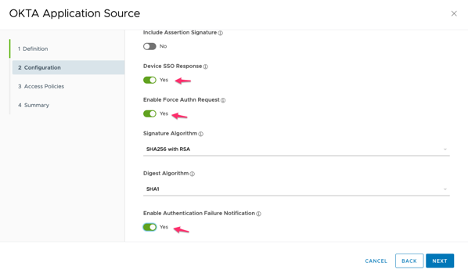
- Next
- Access Policy: Set to the Access policy you want to use
- Authentication requests from Okta applications will be authenticated using this policy
- You can configure the applications which comes from Okta will be opened in Workspace ONE Web (Browser)
- With that you have some additional possibilities
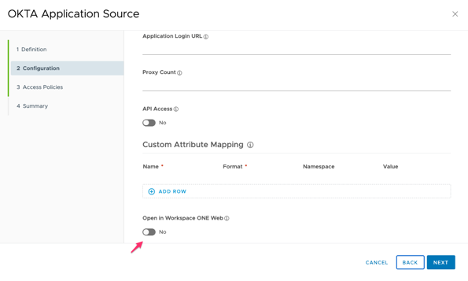
- Next
- Next
- Save
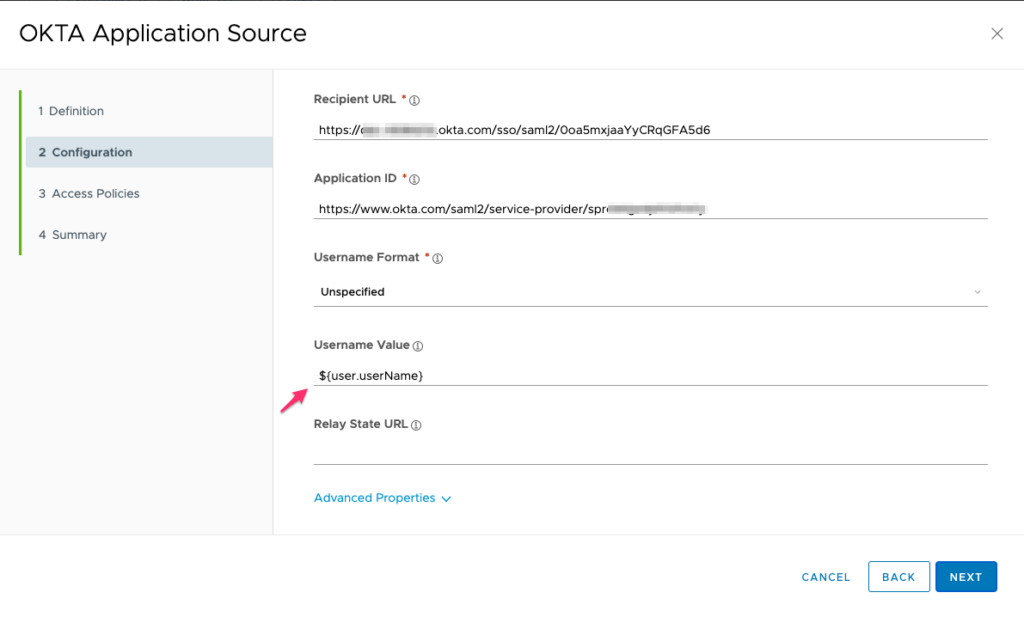
- Open the Okta Application Source again
- Modify the Username Value to match the value that Okta matching against, for instance Okta Username
- Next
- Next
- Save
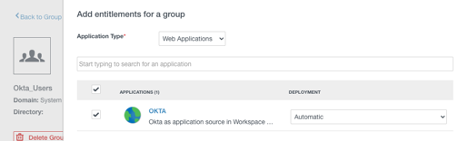
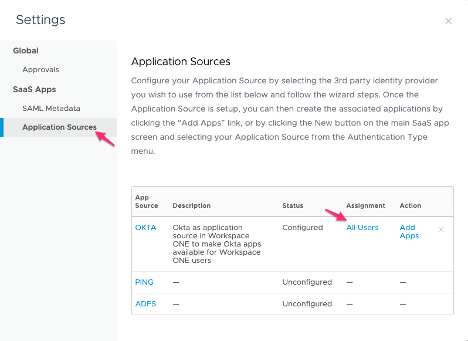
Now we will assign the Okta application source to the Okta user group which we created earlier in Workspace ONE Access or alternatively to the group or user which should use it.
- Stay in Workspace ONE Access administration console
- Catalog (not the arrow near it)
- Settings
- Application Sources
- Okta
- In the Assignment column
- Click All Users
- Add Okta_Users Group which we created
- Set Deployment Type Automatic
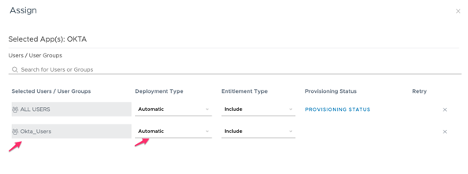
- Alternatively, Click Users & Groups
- Groups
- Choose the Group you want to assign Okta Application Source to
- Tab Apps
- Add Entitlement
- Choose Okta
- Set Deployment to Automatic