Integrate Okta as 3rd party (SAML) iDP in Workspace ONE Access
- Log into your Okta tenant
- Tab Applications
- Click Applications
- Choose your Workspace ONE application
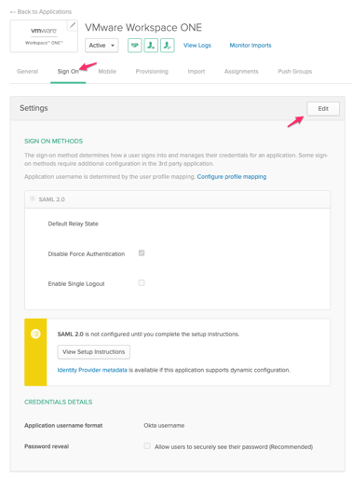
- Click Sign On tab
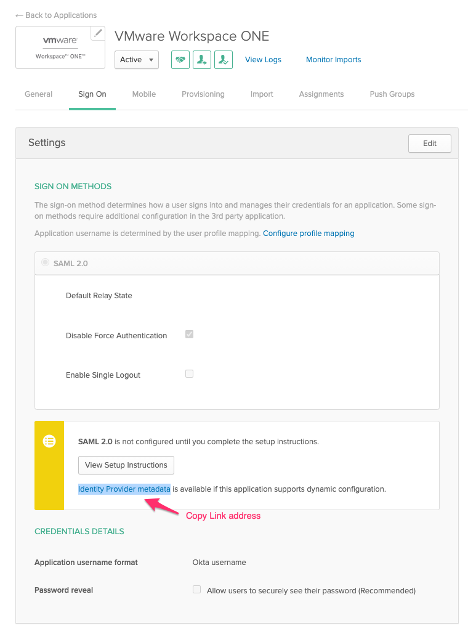
- Click View Setup Instructions
- You will find a really good overview of how to integrate Okta as 3rd party iDP in Workspace ONE Access. The really cool thing is if you click on that button, the SAML Metadata will automatically generated for you to copy and paste.
- Alternatively, you can copy the link address under the button (Identity Provider metadata). That will be the link to your Okta tenant
- Example: https://mytenant.okta.com/app/exk58mly9coobFJPm5d6/sso/saml/metadata
To make this Guide a complete guideline, the configuration steps will look like this:
- Log into the Workspace ONE Access admin console
- Tab Identity & Access Management
- Click Identity Providers
- Add Identity Provider
Choose Create SAML IDP (in older versions of Workspace ONE Access – Third Party IDP)

- Identity Provider Name: Okta (example)
- SAML Metadata: copy the following and paste it in
- Or alternatively the link address as described above
<?xml version="1.0" encoding="UTF-8"?>
<md:EntityDescriptor entityID="http://www.okta.com/exk58mly9coobFJPm5d6"
    xmlns:md="urn:oasis:names:tc:SAML:2.0:metadata">
    <md:IDPSSODescriptor WantAuthnRequestsSigned="false" protocolSupportEnumeration="urn:oasis:names:tc:SAML:2.0:protocol">
        <md:KeyDescriptor use="signing">
            <ds:KeyInfo
                xmlns:ds="http://www.w3.org/2000/09/xmldsig#">
                <ds:X509Data>
                    <ds:X509Certificate>MIIDpjCCAo6gAwIBAgIGAXce/6fvMA0GCSqGSIb3DQEBCwUAMIGTMQswCQYDVQQGEwJVUzETMBEG
A1UECAwKQ2FsaWZvcm5pYTEWMBQGA1UEBwwNU2FuIEZyYW5jaXNjbzENMAsGA1UECgwET2t0YTEU
MBIGA1UECwwLU1NPUHJvdmlkZXIxFDASBgNVBAMMC2Rldi00MDg0MjEyMRwwGgYJKoZIhvcNAQkB
Fg1pbmZvQG9rdGEuY29tMB4XDTIxMDEyMDA4NTIyN1oXDTMxMDEyMDA4NTMyNlowgZMxCzAJBgNV
BAYTAlVTMRMwEQYDVQQIDApDYWxpZm9ybmlhMRYwFAYDVQQHDA1TYW4gRnJhbmNpc2NvMQ0wCwYD
VQQKDARPa3RhMRQwEgYDVQQLDAtTU09Qcm92aWRlcjEUMBIGA1UEAwwLZGV2LTQwODQyMTIxHDAa
BgkqhkiG9w0BCQEWDWluZm9Ab2t0YS5jb20wggEiMA0GCSqGSIb3DQEBAQUAA4IBDwAwggEKAoIB
AQC0Zxscnt5df3FLA9eaLU6W6Ipi/6hX+ooMUuyV4Mvea+AFmbzQah7AnuU9o80L8lJNwiWz7vk8
MvL+j0UvtnHfxQ4v2ftktwxBpeGBOSDXOu9A+kzFnXrqSkkuuWcJC1jPgTPYk+z6gAl0R0A+5jja
dAbd3mYHel+47eJmJbY4H7rNOu+2OAcj6M7b9FUgfEMcwMvkv3LTdi6vdXN68B/3192m2IgyNX4G
fULxHvWgJBFWZDSowUpkdrY04Vo0CC7JpzJgLLpmGtyuCHvKqkz20jsRJCXJ+gyidTJj30iLCXJ2
5MCJYWICjvZ+UXStbr6/YtR/3PN5k8TGN2mm+Cp1AgMBAAEwDQYJKoZIhvcNAQELBQADggEBAGhp
JhaRJuHolWNyV4tCFR4EihfuEmy8jbIR/KsoQBPk1tiHLdZGIr0JPydJ4Ud49GXeYApFQzSqensb
pnqz1Kze+4bTjiCgJ14wgtnI8ZSPrdfQERtzdfbM0o8vpEbuMC9UfJRi1IC69l1epno81F9ubaaa
VZJ+Iq3NbTG5bq7IKOllMfM3xGnZ3D/KGS6u9/0fvYaoYSHZ58kjdK1083ssOPDHgZN0fvmJqQDd
hBYbzSdJEu4CzmNW0KSzUxSr+mWO0A7l5fwKOr1GCIY5ETetcJYrQIofEkQ3w3JbZj1ONnbbCCe7
UgRk9dD8lTaRStLZbu2HCcx/nGbGCWGEq34=</ds:X509Certificate>
                </ds:X509Data>
            </ds:KeyInfo>
        </md:KeyDescriptor>
        <md:NameIDFormat>urn:oasis:names:tc:SAML:1.1:nameid-format:unspecified</md:NameIDFormat>
        <md:NameIDFormat>urn:oasis:names:tc:SAML:1.1:nameid-format:emailAddress</md:NameIDFormat>
        <md:SingleSignOnService Binding="urn:oasis:names:tc:SAML:2.0:bindings:HTTP-POST" Location="https://dev-4084212.okta.com/app/vmwareworkspaceone/exk58mly9coobFJPm5d6/sso/saml"/>
        <md:SingleSignOnService Binding="urn:oasis:names:tc:SAML:2.0:bindings:HTTP-Redirect" Location="https://dev-4084212.okta.com/app/vmwareworkspaceone/exk58mly9coobFJPm5d6/sso/saml"/>
    </md:IDPSSODescriptor>
</md:EntityDescriptor>
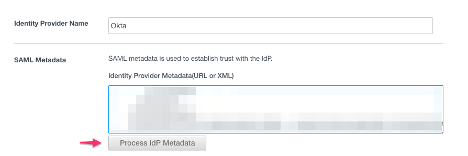
- Click Process IDP Metadata:
- Just-in-Time User Provisioning is optional. You can enable it if you want
- In case you enable that, the user will be created if they log into the first time to Okta
- That will be described in (Just in Time provisioning)
- Check the box Users: Okta Universal Directory
- Check the box Network: All Ranges
- In Authentication Methods add
- Authentication Methods: Okta Password Auth method
- SAML Context: urn:oasis:names:tc:SAML:2.0:ac:classes:PasswordProtectedTransport
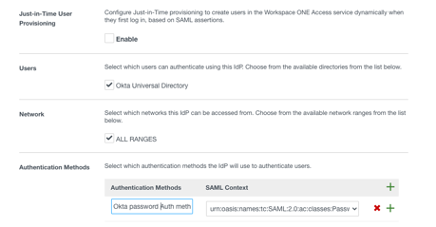
- Click Add
Configure the Access policy for Okta
If you want to login to the Workspace ONE Access user-portal (your Digital Workspace) with your created Okta Account and the Okta password authentication method, we have to create a Access policy within the Workspace ONE Access admin portal.
The Access policies in Workspace ONE Access provide a lot of capabilities and possibilities. Let us take a look into it.
- Log into the Workspace ONE Access admin console
- Click the tab Identity & Access Management
- Click Policies
- Now you can add a new one
- In our case we edit the default Policy
- Click Default_access_policy_set

- In the Access Policy, click Edit
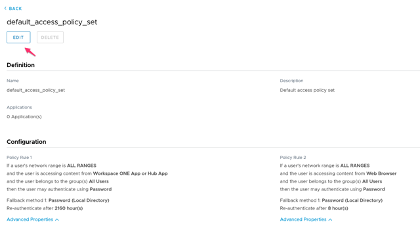
- Choose Configuration from the left list
- Click All Ranges (Web Browser)
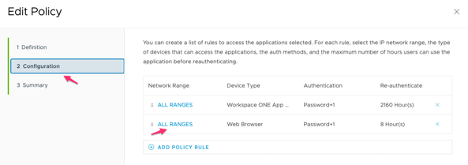
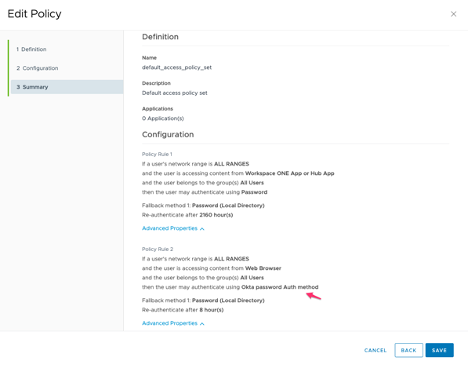
- In then the user may authenticate using* choose your created authentication method from the SAML IDP creation previously. Here: Okta password Auth method
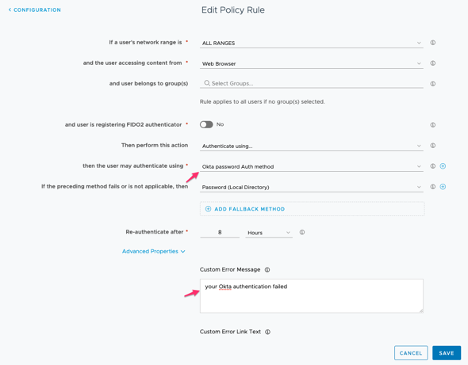
- You can enter a custom error message as well if you want to give the user in case of an error a better impression what´s happened
- You can additionally enter a custom error link text (name of the link which will shown) and a custom error link url (there the users will send to in case of an error; an alternative page).
- Re-authenticate after: 8 hours is default (the users have to re-authenticate every 8 hours. But you can customize it to your needs
- Click Save
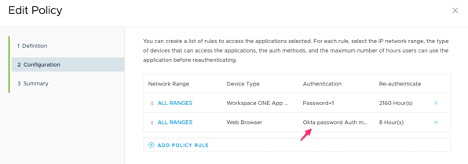
Now your Policy should look like this:
- Click Next
- Click Save
Device compliance
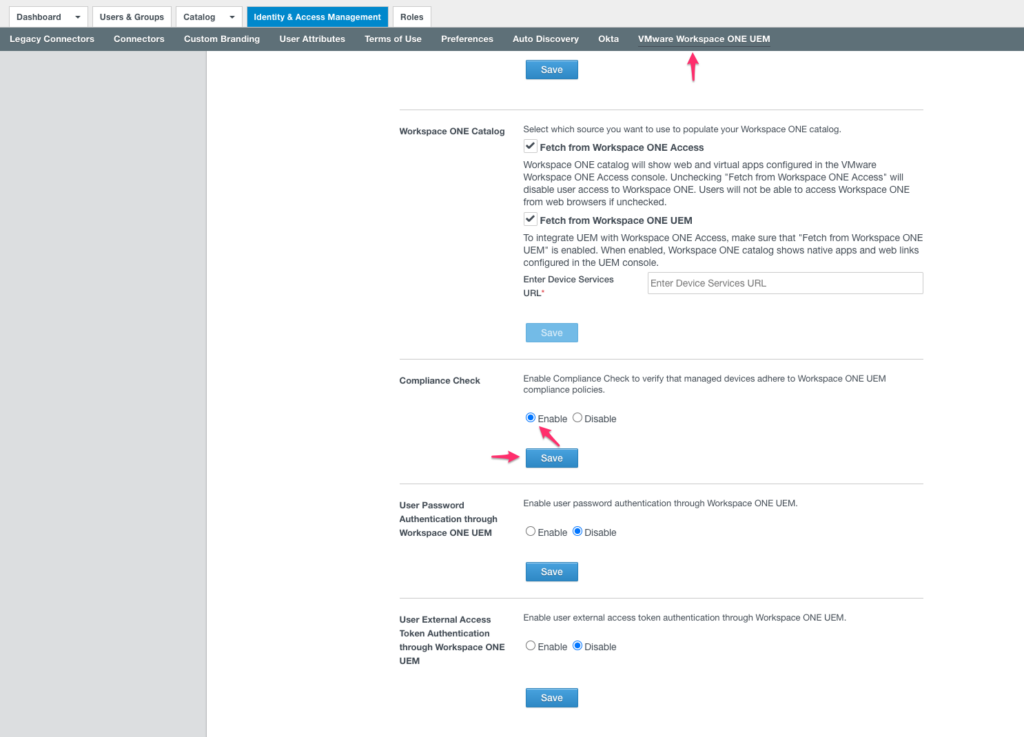
If you want to use Device compliance as well, you have to enable that in the Workspace ONE console.
- Log into Workspace ONE Access administration console
- Identity & Access Management
- Click setup on the right side
- Scroll down and check the box Compliance Check for enable
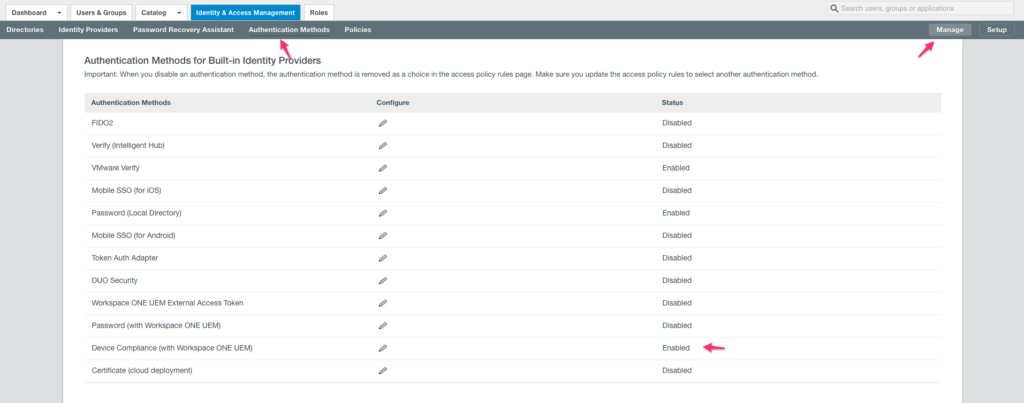
Next check if it´s enabled in the Authentication Methods.
- Click Manage on the right side
- Authentication Methods
- Device Compliance (with Workspace ONE UEM) will be enabled
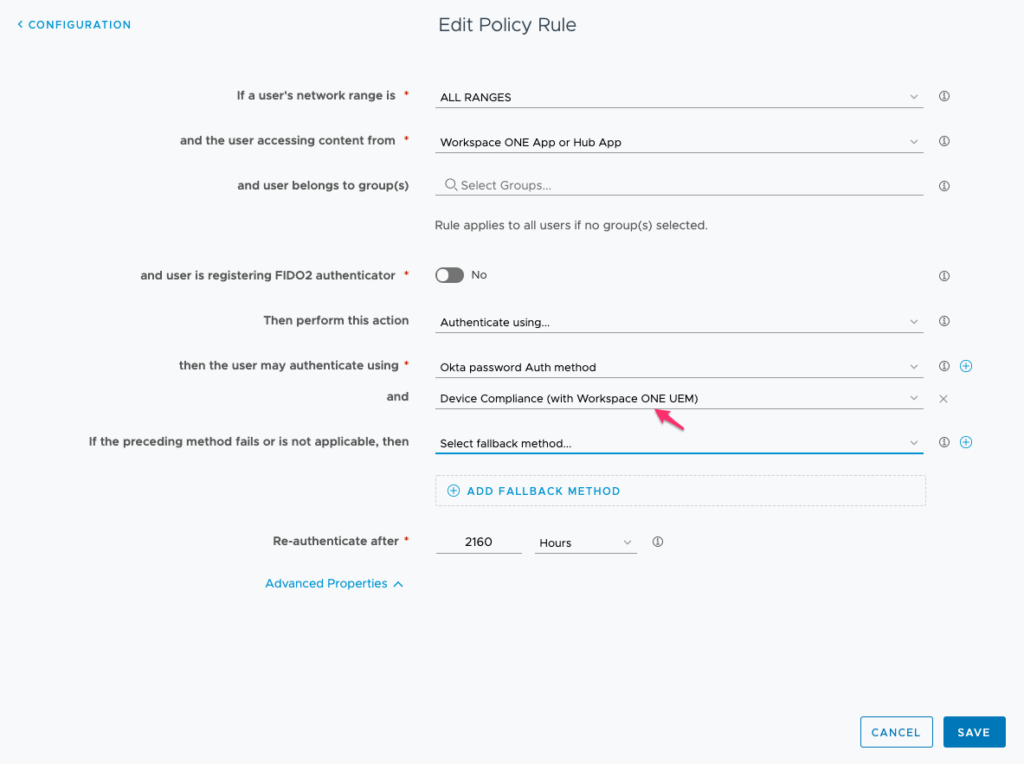
Now we can integrate the device compliance check in the policies for access.
- Policies
- Add Policy or use an existing one
- I use the existing default_access_policy_set
- Edit
- Configuration
- I use the policy for the Workspace ONE App or Hub App
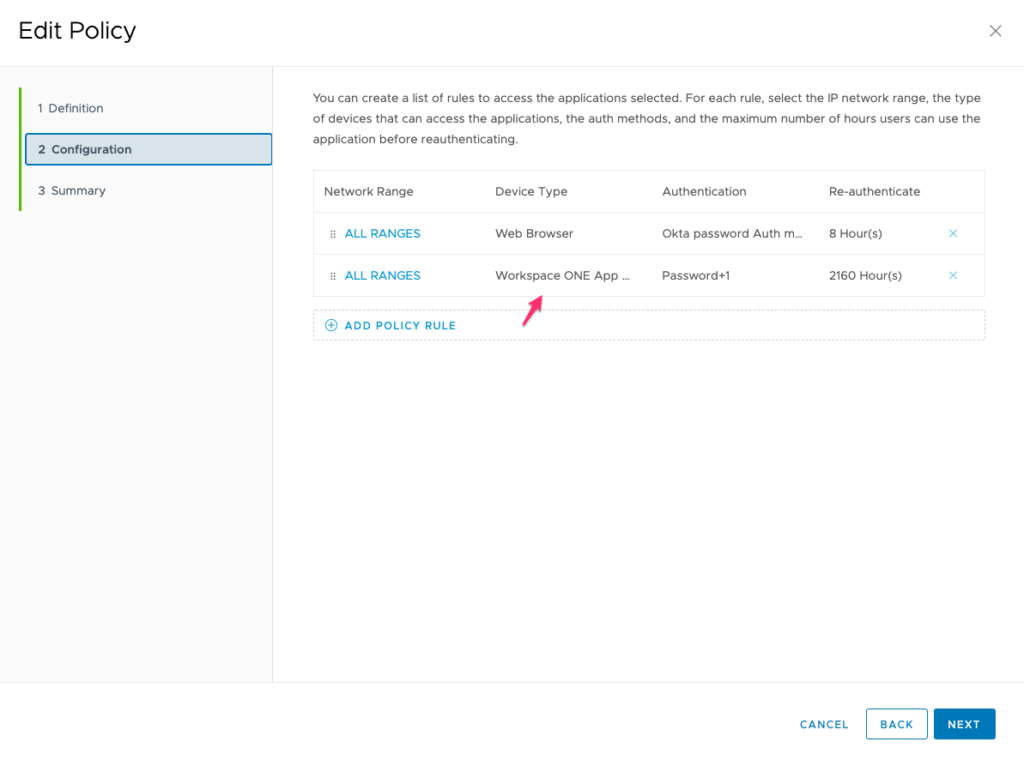
Import to understand is, that you can´t use the device compliance check as the first authentication policy. You have to have a 1st authentication method and add a 2nd one which is the device trust.
SAML authentication from Okta to Workspace ONE – Sign on method
In this step we configure the SAML authentication via Okta to Workspace ONE.
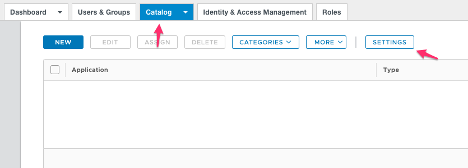
- Log into the Workspace ONE Access admin console
- Click Catalog tab
- Click Settings
- Caution: Don´t click the arrow near the catalog tab and then setting
You should see that:
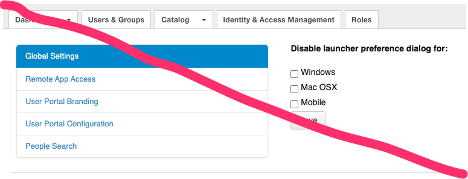
NOT THAT:
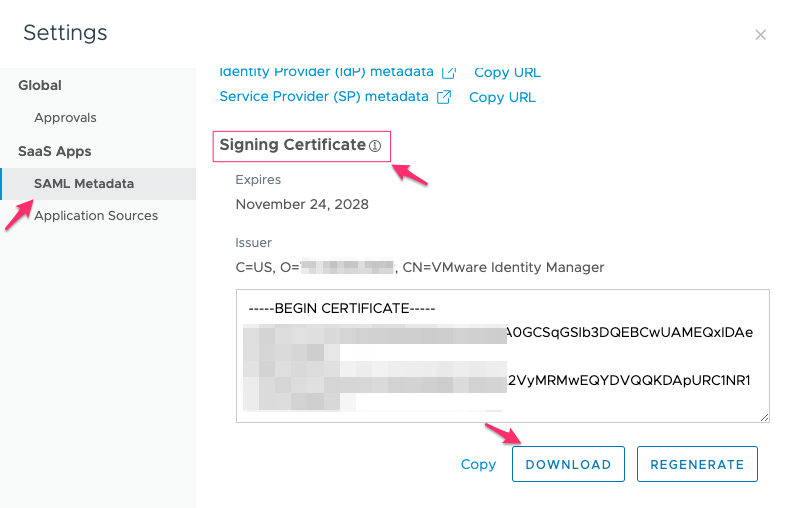
- Click SAML Metadata from the left
- Scroll to Signing Certificate
- Click Download
- Log into the Okta tenant
- Click Applications tab
- Choose Applications
- Click on the created Workspace ONE app
- Click Sign On tab
- In Settings, click Edit
- Check the box Enable Single Logout
- That will show you the additional box for Signature Certificate
- Click Browse
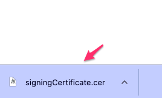
- Choose your previously downloaded certificate and upload it (signingCertificate.cer)
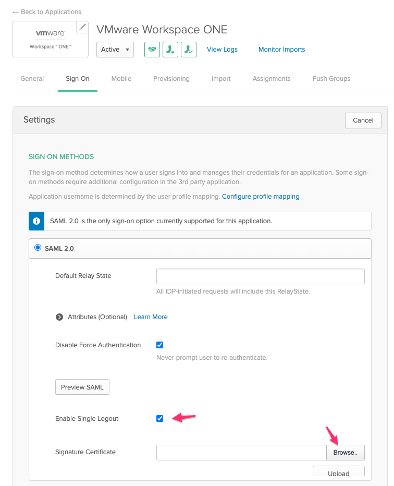
- Click Save at the bottom
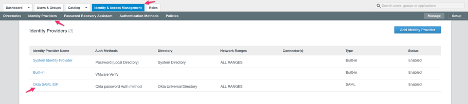
- Log into the Workspace ONE Access admin console
- Click Identity & Access Management tab
- Click Identity Providers
- Click your created SAML IDP (Okta / Okta SAML IDP)
- Now if you refresh the Okta SAML setup instructions page, scroll to step where you copy the SAML metadata. There should be now the SingleLogoutService included in the SAML metadata.

- Copy the updated iDP metadata
<?xml version="1.0" encoding="UTF-8"?>
<md:EntityDescriptor entityID="http://www.okta.com/exk58mly9coobFJPm5d6"
    xmlns:md="urn:oasis:names:tc:SAML:2.0:metadata">
    <md:IDPSSODescriptor WantAuthnRequestsSigned="false" protocolSupportEnumeration="urn:oasis:names:tc:SAML:2.0:protocol">
        <md:KeyDescriptor use="signing">
            <ds:KeyInfo
                xmlns:ds="http://www.w3.org/2000/09/xmldsig#">
                <ds:X509Data>
                    <ds:X509Certificate>MIIDpjCCAo6gAwIBAgIGAXce/6fvMA0GCSqGSIb3DQEBCwUAMIGTMQswCQYDVQQGEwJVUzETMBEG
A1UECAwKQ2FsaWZvcm5pYTEWMBQGA1UEBwwNU2FuIEZyYW5jaXNjbzENMAsGA1UECgwET2t0YTEU
MBIGA1UECwwLU1NPUHJvdmlkZXIxFDASBgNVBAMMC2Rldi00MDg0MjEyMRwwGgYJKoZIhvcNAQkB
Fg1pbmZvQG9rdGEuY29tMB4XDTIxMDEyMDA4NTIyN1oXDTMxMDEyMDA4NTMyNlowgZMxCzAJBgNV
BAYTAlVTMRMwEQYDVQQIDApDYWxpZm9ybmlhMRYwFAYDVQQHDA1TYW4gRnJhbmNpc2NvMQ0wCwYD
VQQKDARPa3RhMRQwEgYDVQQLDAtTU09Qcm92aWRlcjEUMBIGA1UEAwwLZGV2LTQwODQyMTIxHDAa
BgkqhkiG9w0BCQEWDWluZm9Ab2t0YS5jb20wggEiMA0GCSqGSIb3DQEBAQUAA4IBDwAwggEKAoIB
AQC0Zxscnt5df3FLA9eaLU6W6Ipi/6hX+ooMUuyV4Mvea+AFmbzQah7AnuU9o80L8lJNwiWz7vk8
MvL+j0UvtnHfxQ4v2ftktwxBpeGBOSDXOu9A+kzFnXrqSkkuuWcJC1jPgTPYk+z6gAl0R0A+5jja
dAbd3mYHel+47eJmJbY4H7rNOu+2OAcj6M7b9FUgfEMcwMvkv3LTdi6vdXN68B/3192m2IgyNX4G
fULxHvWgJBFWZDSowUpkdrY04Vo0CC7JpzJgLLpmGtyuCHvKqkz20jsRJCXJ+gyidTJj30iLCXJ2
5MCJYWICjvZ+UXStbr6/YtR/3PN5k8TGN2mm+Cp1AgMBAAEwDQYJKoZIhvcNAQELBQADggEBAGhp
JhaRJuHolWNyV4tCFR4EihfuEmy8jbIR/KsoQBPk1tiHLdZGIr0JPydJ4Ud49GXeYApFQzSqensb
pnqz1Kze+4bTjiCgJ14wgtnI8ZSPrdfQERtzdfbM0o8vpEbuMC9UfJRi1IC69l1epno81F9ubaaa
VZJ+Iq3NbTG5bq7IKOllMfM3xGnZ3D/KGS6u9/0fvYaoYSHZ58kjdK1083ssOPDHgZN0fvmJqQDd
hBYbzSdJEu4CzmNW0KSzUxSr+mWO0A7l5fwKOr1GCIY5ETetcJYrQIofEkQ3w3JbZj1ONnbbCCe7
UgRk9dD8lTaRStLZbu2HCcx/nGbGCWGEq34=</ds:X509Certificate>
                </ds:X509Data>
            </ds:KeyInfo>
        </md:KeyDescriptor>
        <md:SingleLogoutService Binding="urn:oasis:names:tc:SAML:2.0:bindings:HTTP-POST" Location="https://dev-4084212.okta.com/app/vmwareworkspaceone/exk58mly9coobFJPm5d6/slo/saml"/>
        <md:SingleLogoutService Binding="urn:oasis:names:tc:SAML:2.0:bindings:HTTP-Redirect" Location="https://dev-4084212.okta.com/app/vmwareworkspaceone/exk58mly9coobFJPm5d6/slo/saml"/>
        <md:NameIDFormat>urn:oasis:names:tc:SAML:1.1:nameid-format:unspecified</md:NameIDFormat>
        <md:NameIDFormat>urn:oasis:names:tc:SAML:1.1:nameid-format:emailAddress</md:NameIDFormat>
        <md:SingleSignOnService Binding="urn:oasis:names:tc:SAML:2.0:bindings:HTTP-POST" Location="https://dev-4084212.okta.com/app/vmwareworkspaceone/exk58mly9coobFJPm5d6/sso/saml"/>
        <md:SingleSignOnService Binding="urn:oasis:names:tc:SAML:2.0:bindings:HTTP-Redirect" Location="https://dev-4084212.okta.com/app/vmwareworkspaceone/exk58mly9coobFJPm5d6/sso/saml"/>
    </md:IDPSSODescriptor>
</md:EntityDescriptor>
- Go back to the Workspace ONE Access admin console
- Identity & Access Management tab
- Identity Providers
- Click your Okta SAML IDP
- Paste the updated SAML metadata into the SAML Metadata field
- Click Process IdP Metadata
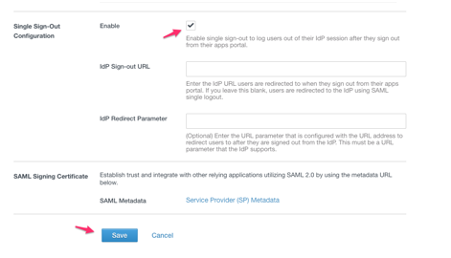
- Scroll down to Single Sign-Out Configuration
- Check the box Enable
- Make sure that IdP Sign-Out URL and IdP Redirect Parameter are keep blank
- Click Save
- Done
Now if you try to login to Workspace ONE the users will directly be redirected to Okta for authentication. There the users can authenticate with the Okta credentials (username / password) as configured in the policy in Workspace ONE Access and if you want to with Multi-Factor-Authentication (MFA) from Okta as well. After the user successfully authenticate, they will be redirected back to the Workspace ONE Access user portal (the Digital Workspace of the users).
Caution: Now if you try to login to Workspace ONE Access as an administrator, it could happen that you will be redirected to Okta and can´t login because your administrator account isn´t integrated in Okta at that moment. Here you can use a kind of a fallback for Workspace ONE Access. Use that URL:
https://mytenant.vmwareidentity.com/SAAS/auth/0 (at the end is the number null).
Note:In case you have issues to login to Workspace ONE Access after the configuration, please check the user credentials details of the user in Okta.
Okta User credentials details (troubleshooting)
- Log into your Okta tenant
- Tab Directory
- Profile Editor
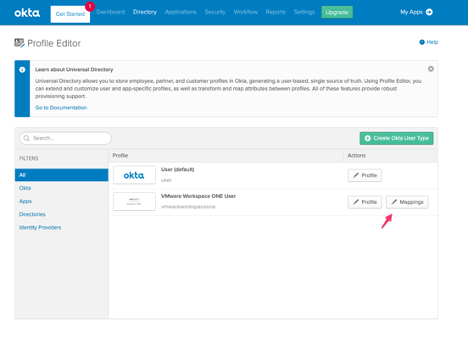
- Click on Mappings for the Workspace ONE User
- Click on Okta User to VMware Workspace ONE on the top
- Check the entry for username
- Update if needed to: substringBefore( user.login, ‘@’)
- Save Mappings